HTML/CSS: Symantic Elements
Web Page Structure
A basic HTML page typically has several parts or sections. These may include:
- the header, with a logo and often the navigation
- the main content, often broken up into sections
- the footer
<div id='header'>
    <h2>Page Title</h2>
    <div id='nav'>
        <li><a href='#'>Link 1</a></li>
        <li><a href='#'>Link 2</a></li>
        <li><a href='#'>Link 3</a></li>
    </div>
</div>
<div id='content'>
      Lorem ipsum...
</div>
<div id='footer'>
    copyright NewWebWorlds.com
</div>
HTML 5
After over a decade of stagnant standards for web design, HTML 5 was released in 2012. One of the main reasons behind the release was to create a set of standards that ALL browsers would follow moving forward. This new version guide included semantic structure tags of block level containers to help programmers better organize their pages. These new semantic tags better identify the the coded sections of a page AND provide a means to better store data for web applications. The new tags included:- <header>-the header of a page or section
- <footer>-the footer of a page or section
- <nav>-the navigation section of a page
- <main>-the area for the main content of a page
- <section>-used for grouping together related content. These are often treated as the main divisions within a page
- <aside>- information that is related to the topic - often used as a sidebar
<header>
    <h2>Page Title</h2>
    <nav>
	<li><a href='#'>Link 1</a></li>
	<li><a href='#'>Link 2</a></li>
	<li><a href='#'>Link 3</a></li>
     </nav>
</header>
<main>
    Lorem ipsum...
</main>
<footer>
    copyright NewWebWorlds.com
</footer>
Note: These elements are block level elements and act just like a div in all ways, except they are more descriptive of the information they hold.
Styling Block Level Elements
Block level elements (div, header, nav, h1, etc) all support box properties. Box properties include width, height, border, floating, margins and padding. Most of these topics have been covered in previous lectures, but here we will focus on margins and padding.
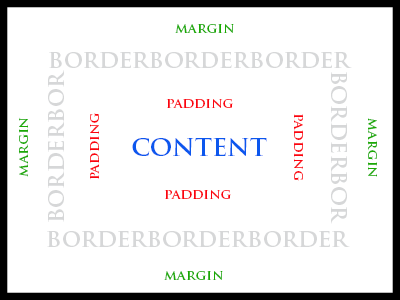
Both margins and padding are providing blank space (known as whitespace) designed to make reading a page easier and to assist with design. The main difference is that margins are outside of the element (between the element and other elements) and padding is inside the element (between the element border and the interior content).
Both margins and padding are providing blank space (known as whitespace) designed to make reading a page easier and to assist with design. The main difference is that margins are outside of the element (between the element and other elements) and padding is inside the element (between the element border and the interior content).
Margin (and padding) styles can be set in a variety of ways. In each case below, the first line (1) is the margin syntax and the second line (2) is the padding syntax.
margin: 10px;
padding: 10px
Sets all four side margins (or padding) to 10px
margin: 10px 5px;
padding: 10px 5px;
Sets the top and bottom margins (padding) to 10px and the left and right to 5px
margin: 10px 8px 6px;
padding: 10px 8px 6px;
Sets the top to 10px, the left and right to 8px and the bottom to 6px.
margin: 10px 8px 6px 4px;
padding: 10px 8px 6px 4px;
Sets the top to 10px, the right to 8px, the bottom to 6px and the left to 4px. The locations start at the top and proceed clockwise around the box.
margin-left: 10px;
padding-left:10px;
There are also a series of style commands that allow the programmer to set just one of the four values. The code above sets the left value to 10px and leaves the other sides at the default value. Other options are margin-right, margin-top, margin-bottom, padding-top, padding-right, and padding-bottom.