JAVA: Loops
Loop Basics
It is often necessary to repeat certain blocks of code for a specified(or unspecified) number of times. We use a control structure known as a loop to accomplish this. Every loop has four basic parts:- Loop control variable declaration/initialization
A loop control variable initialization is a variable that has been declared and initialized.int count=1; String response="yes".
- Loop condition
The loop condition is the condition that allows the loop to continue running. In other words, if the condition is true, the loop will run. Loop conditions are boolean expressions and MUST include the loop control variable.count<=10; response.equals("yes");A bad condition can result in a loop not running or running infinitely. - Control variable alteration/reassignment
The control variable aleteration changes the value of the loop control variable. This can be done through assignment, mathematics or input.count+=2; response=reader.nextLine();
Failure to alter the control variable value will result in an infinite loop. - Loop body
The loop body is the statement(s) to be repeated. These statements can include input, output, calculations, method calls, conditions or even other loops.
Pre Test Loops

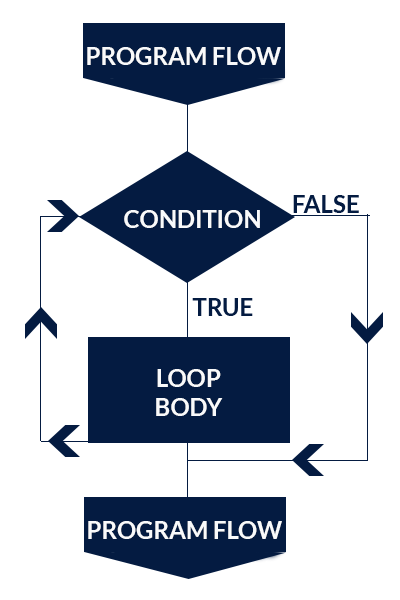
In Pre-Test Loops, the condition is tested before the loop execute. This means that if the condition fails, the code in the loop may never execute.
Note the image on the left. When the condition is true, the loop body executes and the condition is then tested again to repeat the process. When the condition is false, the loop body is skipped and control continues AFTER the loop body.
So, if the condition is false at the start, it is possible that the loop body code does not execute in the run of the program.
So, if the condition is false at the start, it is possible that the loop body code does not execute in the run of the program.
Post Test Loops
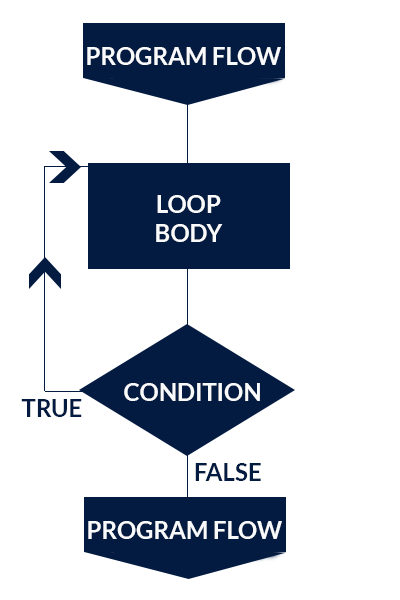
The other variety of a PostTest Loop. In these types of loops, the condition is tested after the loop code runs. The code will always run at least once.
In the image on the right, we see that the program flows right through the loop body code BEFORE it reaches the condition. If the condition is true, the loop repeats; otherwise, the program transfers control to after the loop.
This diagram shows that in a post-test loop, the loop body code will ALWAYS RUN AT LEAST ONE TIME.
This diagram shows that in a post-test loop, the loop body code will ALWAYS RUN AT LEAST ONE TIME.

Finally, Java has two loop keywords that can help control the flow of the loop. Those words are ’break’ and ‘continue.’ Break will immediately send control to the code following the loop. Continue sends control to the top of the loop.
For Loops
A for loop is a pretest iterative structure used most often as a counting loop. Counting loops are set to execute a certain number of times. It also combines three of the four loop requirements into one line. The general form of a for loop is:for(<control var init>; <loop condition>; <control var alt>){
<loop body>
}
for(int count=1; count<=10; count++){
	System.out.println(x);
}
When writing a for loop, it may help to say it out loud to make sure that the condition and alteration are written correctly (thus avoiding an infinite loop). For the loop above, it would read "for count equals one AS LONG AS count is less than 10, increase count by 1."
Here is another example of a for loop that counts to 10 by twos and displays the information on the screen:
for(int count=2; count<=10; count+=2){
	System.out.println(x);
}
The following is a for loop that counts from 10 down to 1 and displays the information on the screen:
for(int count=10; count>=1; count--){
	System.out.println(x);
}
It is important to note that in Java, a variable's scope (the part of the program in which it is valid), is determined by where it is declared. If you declare a variable as part of a for loop, it will NOT be available outside (after) the loop. Thus, it is sometimes advantageous to declare the variable before the loop and simply initialize it in the loop.
int count;
for(count=1; count<=10; count++){
	System.out.println(x);
}
System.out.println(count);
This concept helps if we want to find a total (or average) of a set of numbers. Note the following example:
int total=0;
int count;
for(count=1; count<=10; count++){
	System.out.print("Enter a number:")
	int num=reader.nextInt();
	total+=num;
}
System.out.println("The total is "+total);
double average=((double)total)/count;
System.out.println("The average is "+average);
In the above example, we declare and initialize total PRIOR to the start of the loop allowing total to be used both in and AFTER the loop executes. Additionally, to calculate the average, we must declare the count variable prior to the loop so that it can be used after the loop executes as well.
Nesting Loops
Like all programming control structures, any valid code is allowed inside of the {...} of a loop. This includes input, output, calculations, conditions and yes, more loops. Below is an example of a nested loop that produces a table of values from 1-28, organized into 4 rows and 7 columns.
for(int r=1; r<=4; r++){
	for(int c=1; c<=7; c++){
		System.out.prin(r*c+" ");
	}
	System.out.println(); //move cursor to new line at end of row
}
The outerloop (line 1) will execute 4 times. The inner loop (line 2) will execute 7 times for EACH execution of the outer loop, or a total of 28 times.
Also, be careful to use different loop control variables for each loop.
Also, be careful to use different loop control variables for each loop.
While Loops
A while loop is a pretest iterative structure that can be used as a counting or sentinal loop. A sentinal loop is based on user input and will execute as many times as necessary until the user enters a predefined value. In general, a while loop looks like this:<control var intitialization>
while(<loop condition>) {
<loop body>
<control var alteration>
}
int count=1;
while(count<=10){
	System.out.println(count);
	count++;
}
Note how the four parts of the loop that we used in our for loops are still present, just in a different location.
int input=reader.readInt("Enter a number (-1 to quit)");
while(!(input==-1)){
	input=reader.readInt("Enter a number (-1 to quit)");
}
...
Note the condition in the while loop on line (2). Our sentinal value (loop ending value) is -1. An easy way to set the condition for a sentinal loop is to write the desired ending condition (input==-1) and then negate it.
Also of note, is that the input variable is declared prior to the loop in the priming read (line 1). Be careful not to re-declare it inside the loop for the variable update (line 3).
Also of note, is that the input variable is declared prior to the loop in the priming read (line 1). Be careful not to re-declare it inside the loop for the variable update (line 3).
Do...While Loops
A do while loop is a post-test iterative structure that can be used as a counting, sentinel, or data-verification loop. In general, a do-while loop looks like this:<control var intitialization>
do
{
<control var alteration>
<loop body>
}while(<loop condition>);
Note that the basic structure is the same as a while loop, with the main difference being the condition at the end, instead of the beginning. Also, note the semicolon(;) that is placed after the condition, making it different than our previous loop types.
int count=1;
do{
	System.out.println(count);
	count++;
}while(count<=10);
Do while loops are often used for data verification as we do not need to do a priming read because the loop will always run at least once. To get a number from the user between 1 and 10, the loop might look like this:
int input;
do
{
	System.out.print(\“Enter a number between 1 and 10:")
	input=reader.readInt();
}while(!(input>=1 || input<=10));
...<code to deal with input as program continues>
Note the use of negation to get the correct ending condition. Our desired value is 1<=value<=10. So, we negate that condition to keep the loop running while it is NOT that value. Using DeMorgan's Law, we could also write this condition as input<1 || input>10.